When working on AEM implementations, developers often need to manage dependencies that are not available in public Maven repositories. This article explores two common scenarios:
- Artifact cannot be hosted in Public/Private Repositories In this scenario, you encounter a situation where the required artifact is not available in any public Maven repository, and hosting it in your organization’s repository is not an option.
- Artifact hosted in Private Repositories Here, we assume you have the flexibility to host the required artifact in your organization’s repository but need to secure it with a password.
Lets get into the technical bits:
Scenario 1: Artifact cannot be hosted in Public/Private Maven Repositories
When faced with artifacts that cannot be accommodated within your organization’s repository, you have the option to establish a local repository within your project. This method is particularly useful when you already have the package available, whether in ‘content-package’ packaging or as an OSGi bundle.
Here’s how you can set it up:
Step-1: Create a local repository
- Create a directory named “repository” within your project’s root folder
- Populate the newly created repository with your desired package or JAR file using the following Maven command:
mvn install:install-file  -Dfile=path-to-your-artifact-jar \
-DgroupId=your.groupId \
-DartifactId=your-artifactId \
-Dversion=version \
-Dpackaging=jar \
-DlocalRepositoryPath=path-to-specific-local-repo
As demonstrated in the snapshot below, a Maven repository has been set up within the project’s ‘repository’ folder. The corresponding command is also mentioned below:
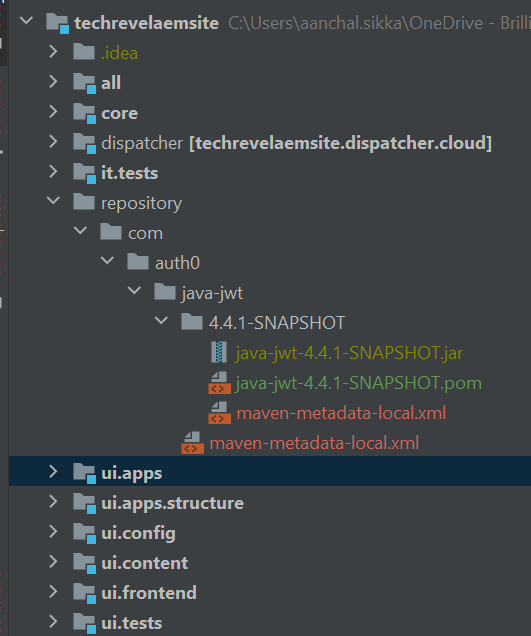
Corresponding command:
- I have placed the jar temporarily in the parent project folder to shorten the sample command
- After executing the command, check the folder specified for “localRepositoryPath” param. The Artifact should have been installed
- Delete the jar that was temporarily placed under parent folder
mvn install:install-file -Dfile=java-jwt-4.4.1-SNAPSHOT.jar \
-DgroupId=com.auth0 \
-DartifactId=java-jwt \
-Dversion=4.4.4-SNAPSHOT\
-Dpackaging=jar \
-DlocalRepositoryPath=repository
Step-2: Configure Maven Project:
Update your Maven project’s main pom.xml file to include repository details under the <repositories> section under <project>. Example:
    <!-- This repository exists inside the source, and will contain 3rd party dependencies not available through Maven Central -->
    <repositories>
        <repository>
            <id>project.local</id>
            <name>project</name>
            <url>file://${project.basedir}/../repository</url>
        </repository>
    </repositories>
Also, add the dependency for the Maven artifact in your main pom.xml and any other module pom.xml files that require it. Example:
   <dependency>
       <groupId>com.auth0</groupId>
       <artifactId>java-jwt</artifactId>
       <version>4.4.1-SNAPSHOT</version>
   </dependency>
Declare the bundle within both the embedded and dependency sections of the all/pom.xml file. This is necessary for deployment of bundle in AEM
<!-- Embed section of all/pom.xml-->
<embedded>
	<groupId>com.auth0</groupId>
	<artifactId>java-jwt</artifactId>
	<type>jar</type>
	<target>/apps/techrevel-packages/application/install</target>
</embedded>

<!-- Dependency section of all/pom.xml-->
<dependency>
	<groupId>com.auth0</groupId>
	<artifactId>java-jwt</artifactId>
</dependency>
You should now be able to build the code via mvn clean install. The depencies should be downloaded to local .m2 folder
Complete code for “Accessing third party bundles from local repo” is available on https://github.com/aanchalsikka/techrevelaemsite/pull/3/files
Scenario 2: Hosting Artifact in Organization’s Repository with Password/Token
When you possess the capability to host the necessary artifact within your organization’s Maven repository, and it necessitates authentication, proceed with these instructions. It’s worth mentioning that I’ve employed the JFrog Trial version for this configuration, and I’ll provide relevant snapshots from JFrog as needed.
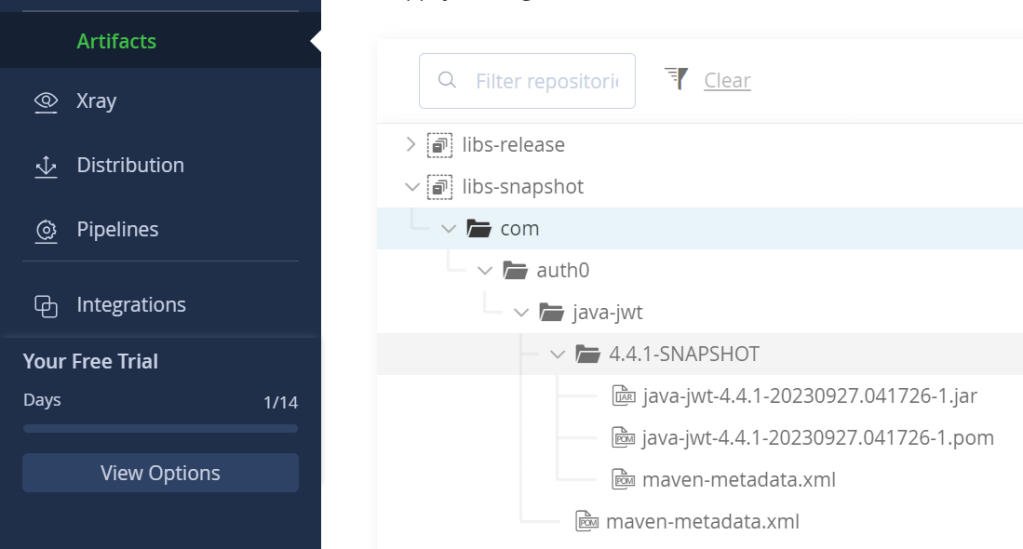
Step 1: Deploy artifact in Maven repository
Perform the deployment of the artifact into your organization’s Maven repository for Maven artifacts. Here, we provide an example of a bundle being deployed in JFrog Artifactory.
Step-2: Configure your local Maven settings to establish connections with remote repositories.
In this step, we will furnish the necessary credentials to connect to a remote JFrog repository. To map these credentials to the specific repository used in your Maven project, a unique identifier enclosed within <id> is employed. To get started, generate a settings.xml file and place it in your user home directory (e.g., ~/.m2/settings.xml) containing the following information:
   <?xml version="1.0" encoding="UTF-8"?>
   <settings xsi:schemaLocation="http://maven.apache.org/SETTINGS/1.2.0 http://maven.apache.org/xsd/settings-1.2.0.xsd" xmlns="http://maven.apache.org/SETTINGS/1.2.0"
       xmlns:xsi="http://www.w3.org/2001/XMLSchema-instance">
     <servers>
       <server>
         <username>YourUsername</username>
         <password>YourPasswordOrToken</password>
         <id>UniqueRepostoryIdentifier</id>
       </server>
     </servers>
   </settings>
Replace ‘YourUsername,’ ‘YourPasswordOrToken,’ and ‘UniqueRepositoryIdentifier’ with your actual login credentials or access token and a unique identifier that serves to distinguish the repository. This identifier can be any value you choose, aiding in the identification of the specific repository.
To generate a token in JFrog, follow these steps:
- Navigate to the ‘Get Started’ tab.
- Choose ‘Connect a developer client.’
- Click the dropdown arrow next to the desired repository.
- Select ‘Generate Token & Create Instructions.’
Replace ‘YourPasswordOrToken’ with the generated token.
Step-3: Configure Maven Project:
Update your Maven project’s main pom.xml file to include repository details under the <repositories> section of maven profiles. Example:
   <repositories>
       <repository>
           <snapshots/>
           <id>UniqueRepositoryIdentifier</id>
           <name>a0uzrmskcncpo-artifactory-primary-0-snapshots</name>
           <url>https://techrevel.jfrog.io/artifactory/libs-snapshot</url>
       </repository>
   </repositories>
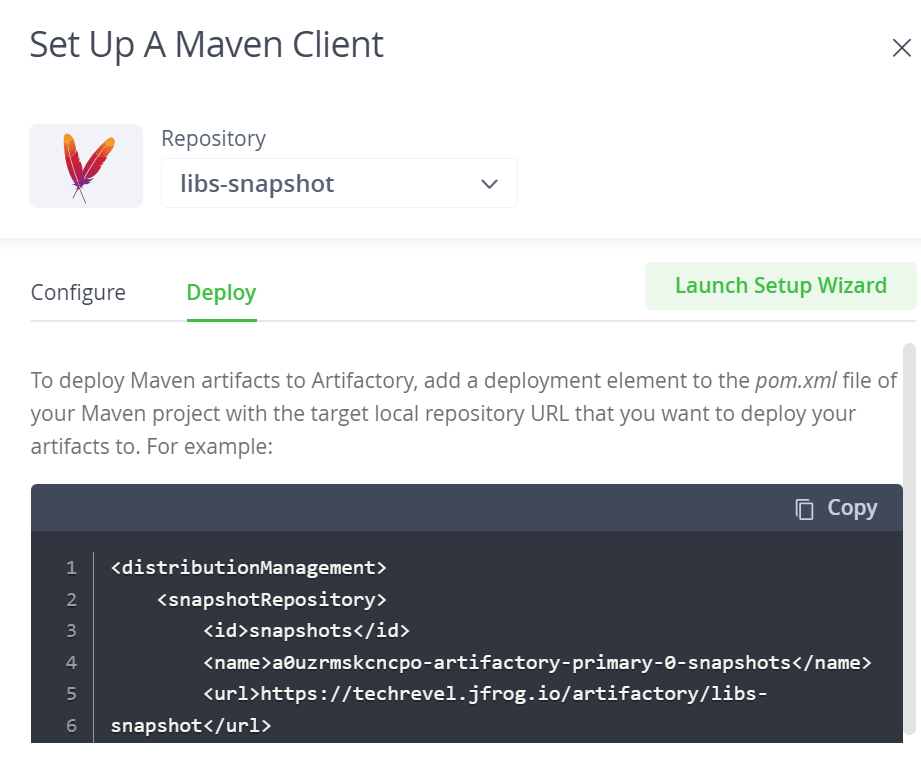
For Jfrog, these details are available under:
Also, add the dependency for the Maven artifact in your main pom.xml and any other module pom.xml files that require it. Example:
   <dependency>
       <groupId>com.auth0</groupId>
       <artifactId>java-jwt</artifactId>
       <version>4.4.1-SNAPSHOT</version>
   </dependency>
Declare the bundle within both the embedded and dependency sections of the all/pom.xml file. This is necessary for deployment of bundle in AEM
<!-- Embed section of all/pom.xml-->
<embedded>
	<groupId>com.auth0</groupId>
	<artifactId>java-jwt</artifactId>
	<type>jar</type>
	<target>/apps/techrevel-packages/application/install</target>
</embedded>

<!-- Dependency section of all/pom.xml-->
<dependency>
	<groupId>com.auth0</groupId>
	<artifactId>java-jwt</artifactId>
</dependency>
You should now be able to build the code via mvn clean install. The depencies should be downloaded to local .m2 folder
Step-4: Set Up Maven Configuration for Adobe’s Cloud Manager:
If you are employing Adobe’s Cloud Manager for AEM deployment, it is essential to establish Maven settings tailored for its use. These configurations will be utilized by Cloud Manager in both the build and deployment processes.
4.1: Add the following profile to your main pom.xml:
   <profile>
       <id>cmBuild</id>
       <activation>
           <property>
               <name>env.CM_BUILD</name>
           </property>
       </activation>
       <repositories>
           <repository>
               <snapshots />
               <id>UniqueRepositoryIdentifier</id>
               <name>libs-snapshot</name>
               <url>https://techrevelartifactory.jfrog.io/artifactory/libs-snapshot</url>
           </repository>
       </repositories>
   </profile>
This profile activates when the env.CM_BUILD property is set, which typically occurs during a Cloud Manager build.
4.2. Add a settings.xml file for Cloud Manager.
Create the necessary folder structure under your Git repository

Configure the settings.xml file just like your local settings.xml.
   <?xml version="1.0" encoding="UTF-8"?>
   <settings xsi:schemaLocation="http://maven.apache.org/SETTINGS/1.2.0 http://maven.apache.org/xsd/settings-1.2.0.xsd" xmlns="http://maven.apache.org/SETTINGS/1.2.0"
       xmlns:xsi="http://www.w3.org/2001/XMLSchema-instance">
     <servers>
       <server>
         <username>YourUsername</username>
         <password>YourPasswordOrToken</password>
         <id>UniqueRepositoryIdentifier</id>
       </server>
     </servers>
   </settings>
Substitute ‘YourUsername,’ ‘YourPasswordOrToken,’ and ‘techrevelartifactory-snapshots’ with your real login credentials or access token and a distinctive identifier to uniquely distinguish the repository.
Complete code for “Accessing third party bundles from a Restricted Repo” is available in https://github.com/aanchalsikka/techrevelaemsite/pull/2
By following these steps, you can securely host and access artifacts in your organization’s Maven repository, ensuring that your AEM implementation is both reliable and compliant with security requirements.

Excellent !!
LikeLiked by 1 person
Example of command running on the project path (Windows) –
mvn install:install-file -Dfile=C:\downloads\xyz-5.9.zip -DgroupId=com.x.y.z-DartifactId=xyz-integration -Dversion=5.9 -Dpackaging=zip -DlocalRepositoryPath=C:\Users\john\simplechat\repository
Here -Dfile should have path upto the zip or jar file otherwise you will end up with error Access Denied.
LikeLiked by 1 person
[ERROR] Failed to execute goal com.adobe.aem:aemanalyser-maven-plugin:1.5.8:project-analyse (aem-analyser) on project xxxx.all: A fatal error occurred while analysing the features, see error cause:: Unable to get bundle symbolic name from artifact com.captcha:botdetect-servlet:4.0.beta3.7 -> [Help 1]
Hi Anchal , excellent post.While it worked for few jars but it’s failing for some with error related to symbolic name.Whats the next step for such issues ?
LikeLike
Please cross-check is botdetect-servlet is a jar or a bundle.
If its a jar, then convert them into a bundle and use above steps to install in AEM and make bundle part of your local repository. Details are available here: AEM — Convert a JAR to an OSGI bundle | by Manu Mathew | Medium
LikeLike