@Component Annotation
An component is a piece of code that is managed by OSGi container. The container would be responsible for its instantiation and management.
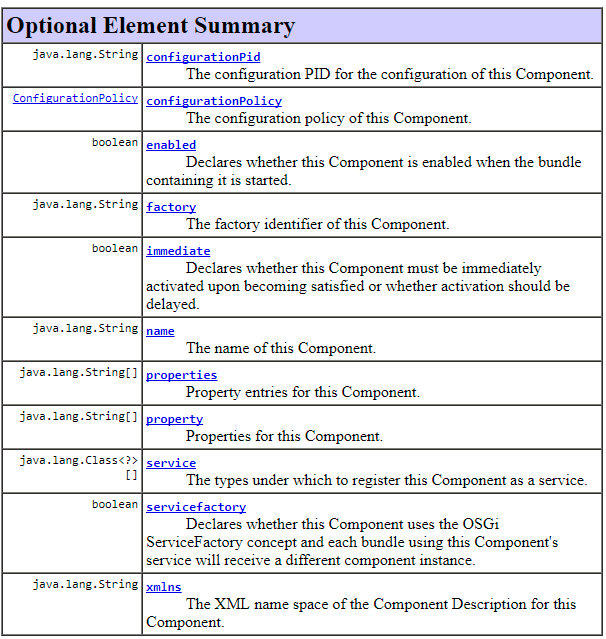
Attributes of a component:

The above table have been noted from: https://www.knopflerfish.org/releases/5.2.0/docs/javadoc/org/osgi/service/component/annotations/Component.html
- configurationPolicy: The attribute can hold following values of ConfigurationPolicy
- IGNORE: Always allow the component configuration to be satisfied and do not use the corresponding Configuration object even if it is present.
- OPTIONAL: Use the corresponding Configuration object if present but allow the component to be satisfied even if the corresponding Configuration object is not present.
- REQUIRE: There must be a corresponding Configuration object for the component configuration to become satisfied. A component is activated only after all its service dependencies are satisfied by the container.
- factory: used to create a configuration factory. More implementation details are available on link.
- name: The attribute doesn’t support special characters. If invalid, the component will not be registered.
- property: A replacement for “@Properties felix annotation used at Class-level”.
- service: registers component as a Service. More implementation details available on link.
Example:
To create a component, add @Component annotation to a class. Also, configure its attributes as per your need.
In the following example, we have:
- @Activate annotation: It is used to mark a function which would be called when the component activates. The function can have any name.
- @Deactivate annotation: It is used to mark a function which would be called when the component deactivates. The function can have any name.
- Declared a custom property using property attribute.
This file contains bidirectional Unicode text that may be interpreted or compiled differently than what appears below. To review, open the file in an editor that reveals hidden Unicode characters.
Learn more about bidirectional Unicode characters
| package blog.techrevel.component.impl; | |
| import org.osgi.service.component.annotations.Component; | |
| import org.slf4j.Logger; | |
| import org.slf4j.LoggerFactory; | |
| import org.osgi.service.component.ComponentContext; | |
| import org.osgi.service.component.annotations.Activate; | |
| import org.osgi.service.component.annotations.Deactivate; | |
| @Component(name = "Sample Component", property = { "testProperty=Hello" }) | |
| public class SampleComponentImpl { | |
| private static final Logger LOGGER = LoggerFactory.getLogger(SampleComponentImpl.class); | |
| @Activate | |
| protected void activate(ComponentContext componentContext) { | |
| LOGGER.info("Registering: " + componentContext.getProperties().get("testProperty").toString()); | |
| } | |
| @Deactivate | |
| protected void deactivate(ComponentContext componentContext) { | |
| LOGGER.info("Deregistering: " + componentContext.getProperties().get("testProperty").toString()); | |
| } | |
| } |
More on defining property:
The property annotations have moved to their own class which declutters the component or service. For components with a large amount of properties, create an independent class, while a component with only one or two properties may be fine as a subclass.
A property value is read from componentContext in @Activate/@Deactivate methods.
If you need multiple properties for a component, declare them as an indiviadual value array of values for property attribute:
This file contains bidirectional Unicode text that may be interpreted or compiled differently than what appears below. To review, open the file in an editor that reveals hidden Unicode characters.
Learn more about bidirectional Unicode characters
| package blog.techrevel.component.impl; | |
| import org.osgi.service.component.annotations.Component; | |
| import org.slf4j.Logger; | |
| import org.slf4j.LoggerFactory; | |
| import org.osgi.service.component.ComponentContext; | |
| import org.osgi.service.component.annotations.Activate; | |
| import org.osgi.service.component.annotations.Deactivate; | |
| @Component(property = { "testProperty1=Hello", "testProperty2=World" }) | |
| public class MultipleComponentPropertiesImpl { | |
| private static final Logger LOGGER = LoggerFactory.getLogger(MultipleComponentPropertiesImpl.class); | |
| @Activate | |
| protected void activate(ComponentContext componentContext) { | |
| LOGGER.info("Registering: " + componentContext.getProperties().get("testProperty1").toString()); | |
| LOGGER.info("Registering: " + componentContext.getProperties().get("testProperty2").toString()); | |
| } | |
| @Deactivate | |
| protected void deactivate(ComponentContext componentContext) { | |
| LOGGER.info("Deregistering: " + componentContext.getProperties().get("testProperty1").toString()); | |
| LOGGER.info("DeRegistering: " + componentContext.getProperties().get("testProperty2").toString()); | |
| } | |
| } |
To define multiple values of a property, create each value as a separate element of the property Array.
This file contains bidirectional Unicode text that may be interpreted or compiled differently than what appears below. To review, open the file in an editor that reveals hidden Unicode characters.
Learn more about bidirectional Unicode characters
| package blog.techrevel.component.impl; | |
| import org.osgi.service.component.annotations.Component; | |
| import org.slf4j.Logger; | |
| import org.slf4j.LoggerFactory; | |
| import java.lang.reflect.Array; | |
| import java.util.ArrayList; | |
| import java.util.List; | |
| import org.osgi.service.component.ComponentContext; | |
| import org.osgi.service.component.annotations.Activate; | |
| import org.osgi.service.component.annotations.Deactivate; | |
| @Component(property = { "testProperty1=hello", "testProperty2=A", "testProperty2=B", "testProperty2=C" }) | |
| public class ComponentMultivaluedPropertyImpl { | |
| private static final Logger LOGGER = LoggerFactory.getLogger(ComponentMultivaluedPropertyImpl.class); | |
| @Activate | |
| protected void activate(ComponentContext componentContext) { | |
| LOGGER.info("Registering: " + componentContext.getProperties().get("testProperty1").toString()); | |
| Object[] arr = convertToObjectArray(componentContext.getProperties().get("testProperty2")); | |
| for (Object obj : arr) { | |
| LOGGER.info("Registering testProperty2: " + obj); | |
| } | |
| } | |
| @Deactivate | |
| protected void deactivate(ComponentContext componentContext) { | |
| LOGGER.info("Deregistering: " + componentContext.getProperties().get("testProperty1").toString()); | |
| Object[] arr = convertToObjectArray(componentContext.getProperties().get("testProperty2")); | |
| for (Object obj : arr) { | |
| LOGGER.info("DeRegistering testProperty2: " + obj); | |
| } | |
| } | |
| static Object[] convertToObjectArray(Object array) { | |
| Class ofArray = array.getClass().getComponentType(); | |
| if (ofArray.isPrimitive()) { | |
| List ar = new ArrayList(); | |
| int length = Array.getLength(array); | |
| for (int i = 0; i < length; i++) { | |
| ar.add(Array.get(array, i)); | |
| } | |
| return ar.toArray(); | |
| } else { | |
| return (Object[]) array; | |
| } | |
| } | |
| } |
Creating configurable properties
The annotations described in this section will help you to create Components whose configurations can be edited via OSGi console. To achieve the same:
- Create a separate or an inner interface which would hold configurations. In example, we have created Config interface.
- Add @ObjectClassDefinition annotation to the interface. Also, add desired attributes
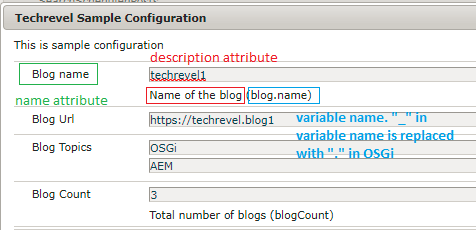
- name: The name would help you search the configuration in OSGi’s configuration manager.
- Add @Designate to the Component that would consume the configurations. The ocd attribute should refer to the Configuration interface created in Step-2.
- Declare properties that you would like to configure via @AttributeDefinition
- To define property names similar to
blog.name, your method would be namedblog_name - Following image maps annotation attributes with the OSGi UI.

- Please note that there are 2 ways to define default values:
- defaultValue attribute of @AttributeDefinition: The value is displayed to the user, when he/she tries to configure the interface via Configuration manager. OSGi will NOT pick this default value, if no Configuration exists. Thus, when you install a bundle, the output would appear as:

- Specifying default value in variable declarartion: The value is displayed to the user, when he/she tries to configure the interface via Configuration manager. OSGi will pick this default value, even if no Configuration exists.
- defaultValue attribute of @AttributeDefinition: The value is displayed to the user, when he/she tries to configure the interface via Configuration manager. OSGi will NOT pick this default value, if no Configuration exists. Thus, when you install a bundle, the output would appear as:
- To define property names similar to
This file contains bidirectional Unicode text that may be interpreted or compiled differently than what appears below. To review, open the file in an editor that reveals hidden Unicode characters.
Learn more about bidirectional Unicode characters
| package blog.techrevel.component.impl; | |
| import org.osgi.service.component.annotations.Activate; | |
| import org.osgi.service.component.annotations.Component; | |
| import org.osgi.service.metatype.annotations.AttributeDefinition; | |
| import org.osgi.service.metatype.annotations.AttributeType; | |
| import org.osgi.service.metatype.annotations.Designate; | |
| import org.osgi.service.metatype.annotations.ObjectClassDefinition; | |
| import org.osgi.service.metatype.annotations.Option; | |
| import org.slf4j.Logger; | |
| import org.slf4j.LoggerFactory; | |
| @Component | |
| @Designate(ocd = ConfigurableComponentPorpertiesImpl.Config.class) | |
| public class ConfigurableComponentPorpertiesImpl { | |
| private static final Logger LOGGER = LoggerFactory.getLogger(ConfigurableComponentPorpertiesImpl.class); | |
| @ObjectClassDefinition(name = "Techrevel Sample Configuration", description = "This is sample configuration") | |
| public @interface Config { | |
| @AttributeDefinition(name = "Blog name", defaultValue = "techrevel", description = "Name of the blog") | |
| String blog_name(); | |
| @AttributeDefinition(name = "Blog Url") | |
| String blog_URL() default "https://techrevel.blog"; | |
| // Multi-values property | |
| @AttributeDefinition(name = "Blog Topics") | |
| String[] blog_Topics() default { "OSGi", "AEM" }; | |
| @AttributeDefinition(name = "Blog Count", description = "Total number of blogs", type = AttributeType.INTEGER) | |
| int blogCount() default 0; | |
| // Password | |
| @AttributeDefinition(name = "password", type = AttributeType.PASSWORD) | |
| String password(); | |
| // Checkbox | |
| @AttributeDefinition(name = "Blog is active?") | |
| boolean blogIsActive() default true; | |
| // Dropdown | |
| @AttributeDefinition(name = "Blog is hosted at?", options = { @Option(label = "WordPress", value = "wordpress"), | |
| @Option(label = "Blogspot", value = "blogspot") }) | |
| String hostedAt() default ""; | |
| } | |
| @Activate | |
| protected void activate(final Config config) { | |
| LOGGER.info("Blog name: " + config.blog_name()); | |
| LOGGER.info("Blog URL: " + config.blog_URL()); | |
| for (String topic : config.blog_Topics()) { | |
| LOGGER.info("Blog Topics: " + topic); | |
| } | |
| LOGGER.info("Blog Count: " + config.blogCount()); | |
| LOGGER.info("Blog Password: " + config.password()); | |
| LOGGER.info("Blog Is Active? " + config.blogIsActive()); | |
| LOGGER.info("Blog is hosted at? " + config.hostedAt()); | |
| } | |
| } |
Also, note that we no longer need PropertiesUtil to resolve OSGi configurations. 🙂
Notes:
Via Declarative Services, the number of annotations have been reduced. For example: @Component annotation is used for:
- Component
- Service
- Servlet
- Filter etc..
All of the above can be created by utilizing attributes of @Component details. More details are available on specific links
One thought on “DS Annotations – Component, property and configurations”