In the realm of web performance optimization, cache management stands as a cornerstone for delivering content swiftly and efficiently to users. Yet, in the ever-evolving landscape of dynamic content updates, knowing when and how to clear cached data becomes a critical consideration. This is precisely where cache flush strategies shine.
Let’s explore how these strategies can empower you to take control of your cache and deliver a seamless user experience.
Strategy-1: Content Invalidation
When content is updated or modified in the AEM instances, the Dispatcher utilizes content invalidation mechanisms to ensure that the outdated cached content is removed. This ensures that users are served with the most current content while minimizing unnecessary cache purges.
The invalidation is based on folder hierarchy. The Dispatcher, generates special “.stat” files in each folder from the main folder to a certain level you set. The main folder is considered level 0.

When you invalidate a file at a specific level, all “.stat” files from the main folder to that level or the designated “statfileslevel” (whichever is lower) are updated.
Any other page that shares one of these .stat files as its nearest .stat ancestor is then marked as “invalidated,” essentially becoming “stale.”
The subsequent request for invalidated content prompts the content to be retrieved again from the publish tier.
To explore content invalidation locally, you would need to:
- Set up
statfileslevel - configure Dispatcher Flush agent on AEM publish
- Allow AEM publish to flush dispatcher’s cache.
Details of each step are explained below:
Step-1: Configuring statfileslevel for granular content invalidation
By default, the statfileslevel setting in the default.farm configuration (of AEM as a cloud service sdk) is set to 2. This means that .stat files are generated in three different folder locations:
- <
docroot> - <docroot>/
content - <docroot>/
content/wknd.
If you want to increase the value of statfileslevel, follow these steps:
- Duplicate the
default.farmconfiguration file and give it a new, easily recognizable name, liketechrevel.farm. This will be your custom configuration. - In the duplicated
techrevel.farmfile, update thestatfileslevelvalue to your desired level. - Duplicate the
default.farmfile from theenabled_farmsdirectory to the same location as your custom configuration. Name it something relevant. - In the duplicated enabled farm file, update the reference from
default.farmto your custom configuration (techrevel.farm). - Restart the web server. At this point, the
statfilelevelwill be updated. However, if you test the Dispatcher Flush Agent, it might fail (403 Forbidden). Follow the next section to fix it.
Step-2: Set up Dispatcher Flush Agent OR Resolve 403 Forbidden error in Dispatcher Flush Agent
Update Dispatcher Flush Agent
- Open the Dispatcher Flush Agent at
http://localhost:4503/etc/replication/agents.publish/flush.html - Click on “Edit”
- Update the configurations to use the port of the Dispatcher.
Step-3: Allow dispatcher flush from AEM publish
allowedClients property in dispatcher defines which clients or sources are permitted to send cache invalidation requests to the Dispatcher. This setting helps ensure the integrity and security of your website’s cached content and prevents unauthorized entities from triggering cache invalidation.
In order to allow AEM publish to invalidate dispatcher’s cache:
- In the Dispatcher, create a copy of
cache/default_invalidate.anyand give it a suitable name, such astechrevel_invalidate.any. - Add configurations to allow the “localhost” and “127.0.0.1” to flush the Dispatcher cache.
- Open the
techrevel.farmconfiguration file for editing. Configure theallowedClientsto point to the custominvalidate.anyfile you created in the previous step. - Restart the web server.
- Test the connection of the Dispatcher Flush Agent. This time, it should be successful.
- In case the test connection fails, check dispatcher’s logs for a statement like “Flushing rejected from <Publish_IP>, referer: about:blank“. If found, add the <Publish_IP> to the
allowedClients. Restart web server and test Dispatcher Flush Agent
- In case the test connection fails, check dispatcher’s logs for a statement like “Flushing rejected from <Publish_IP>, referer: about:blank“. If found, add the <Publish_IP> to the
Final config in allowedClients section might look like
# Contains the AEM backend that is allowed to invalidate the cache on the dispatcher
/0001 {
	/type "deny"
	/glob "*.*.*.*"
}
/0002 {
	/type "allow"
	/glob "${AEM_IP}"
}
#allow local host connection
/0003 {
	/type "allow"
	/glob "localhost"
}
/0004 {
	/type "allow"
	/glob "127.0.0.1"
}
/0005 {
	/type "allow"
	/glob "<PUBLISH_IP>"
}
These steps help you configure content invalidation in the AEM Dispatcher, ensuring that cached content is refreshed properly when changes are made to your AEM instance. By adjusting settings in configuration files and making sure to update references and configurations accordingly, you’re enabling smoother content delivery through your Dispatcher.
Possible issue: “.stat” files are not generated on dispatcher on accessing the pages.
.stat files are created when “Dispatcher flush agent” is triggered on AEM publish. Thus, if you are encountering issues, where .stat files are not created/updated, check for replication logs in AEM publish (via error.log).
What happens when we publish a content with content invalidation feature?
Here’s a step-by-step guide explaining the process sequentially:
1. Content Publishing:
- When you publish content from the authoring environment, it’s sent over to the AEM publish environment. This step ensures that the content becomes available for users to see.
2. Replication Receive Event:
- This action triggers what’s known as a “replication receive event.” It’s like a signal that tells the AEM system that new content has arrived on the publish environment.
3. Dispatcher Flush Agent:
- As a response to the replication receive event, the “Dispatcher Flush agent” on the AEM publish instance springs into action. It’s like a messenger that’s told to do something when specific events occur.
- This agent sends a special message, known as a request, to the AEM Dispatcher. The request’s purpose is to tell the Dispatcher that it needs to refresh its cache because new content has arrived.
4. Cache Invalidation and .stat Files:
- Cache invalidation means that the Dispatcher’s stored data (or cache) needs to be updated with new information.
- To make this happen, something interesting takes place: all the
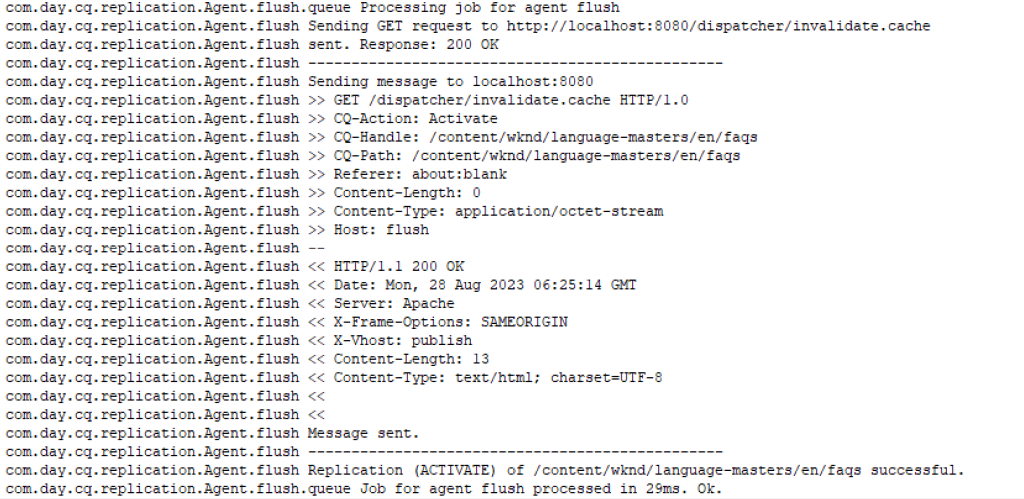
.statfiles along the path to the recently updated content have their timestamps updated. This change in time tells the Dispatcher that these files have been affected and need attention. Example: when we publish “/content/wknd/language-masters/en/faqs”, following “.stat” files were touched

Corresponding Dispatcher Flush request looks like:
5. User Requests an Updated Page:
- When a user wants to see the fresh content, they send a request to the website. Think of it as raising their hand to say, “Hey, show me this!”
6. Dispatcher Guides the Request:
- Instead of showing the content immediately, the Dispatcher guides the request over to the AEM publish environment. It’s like a helpful signpost pointing the user in the right direction.
7. Content Generation and Caching:
- The AEM publish environment gets to work. It generates the requested content, making sure it’s up-to-date.
- After generating the content, the AEM publish environment sends it back to the Dispatcher. The Dispatcher doesn’t just show it to the user; it also stores a copy of the content in its cache. This cache is like a storage room for quick access.
8. Stale Files and Fresh Requests:
- Now, here’s something interesting. Remember those
.statfiles we talked about earlier? They’re part of a bigger story. - Any files in the same folder or sub-folders as the touched
.statfile are also marked as “stale.” This means they might need updating because something related has changed. - If there’s a request for these stale files, the Dispatcher says, “Hold on, let me check if there’s something new.” It sends another request to the AEM publish environment to get fresh content. Once the new content arrives, it’s stored in the Dispatcher’s cache again.
In this step-by-step journey, we’ve seen how content gets published, how the Dispatcher and the AEM publish environment work together, and how even small changes like updating timestamps can lead to better and faster user experiences.
For further insight into the functionality of .stat files, refer to the documentation: “Invalidating Files by Folder Level.“
Strategy-2: Time-to-live
Time-to-live (TTL) configuration in a dispatcher typically refers to the amount of time a cached resource or response should be considered valid before it’s considered stale and needs to be revalidated. This is a crucial configuration to manage caching behavior and ensure that users receive up-to-date content while optimizing server load and response times.
Use Case: E-Commerce Product Availability
Scenario: An e-commerce website uses Adobe Experience Manager (AEM) for its frontend, but the product availability information is generated by an external inventory management system. The product availability status can change frequently based on real-time sales and stock updates. To minimize the load on the inventory system and improve response times for users, the website employs a dispatcher cache to store and serve the product availability information.
Enabling Time-to-live
- Go to farm file and assure that following config is enabled:
/enableTTL "1"
2. Install ACS AEM commons package on publish instance
3. Add a config to “ACS AEM Commons – Dispacher Cache Control Header – Max Age”, as per the screenshot below
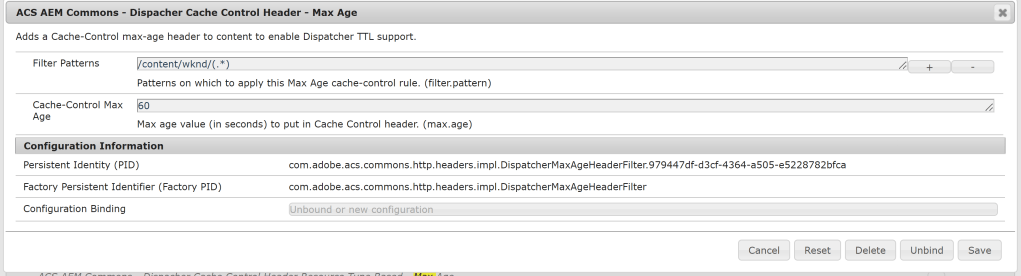
4. Restart apache
The TTL of 60 days should now be enabled on the matching path. Please note that the config is a factory. Hence, one can configure different max-age for different asset types.
What happens on accessing resources with TTL enabled?
When http://localhost:8080/content/wknd/language-masters/en/about-us.html is accessed, following files are created in cache.

In case of TTL, if the headers contain a Cache-Control, max-age or Expires date, an auxiliary, empty file next to the cached file is created, with the modification time equal to the expiry date.
- When the current time is BEFORE the last modified timestamp of a cached resource’s .ttl file, it is considered VALID:

- When the current time is AFTER the last modified timestamp of a cached resource’s .ttl file, it is considered STALE

- When the cache entry is not found

For more details on enableTTL, refer to link
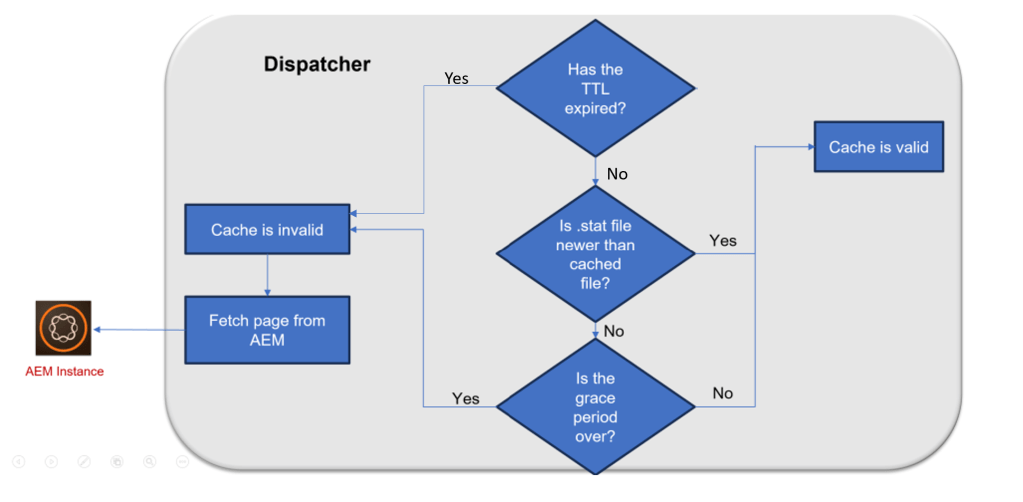
Optimizing Cache Expiration and Invalidation Strategies
If a file hasn’t expired based on its Time-to-Live (TTL) or if the /enableTTL configuration is not set, the standard cache invalidation rules are applied. These standard rules are set by parameters such as /statfileslevel and /invalidate. This means that the Dispatcher can invalidate files even before their TTL has expired.
This provides support for Longer TTL with Invalidation. This approach prioritizes content freshness over maintaining a high cache-hit ratio on the Dispatcher.
How to ignore Files via Invalidation Rules:
To ignore specific files, you can configure invalidation rules in the cache section. In the provided example, files ending in .example.html are ignored for cache invalidation and will expire only when their set TTL has passed.
  /invalidate
  {
   /0000  { /glob "*" /type "deny" }
   /0001  { /glob "*.html" /type "allow" }
   /0002  { /glob "*.example.html" /type "deny" }
  }
Debugging the Dispatcher cache:
To troubleshoot issues related to responses cached by the Dispatcher, you can utilize the X-Dispatcher-Info header in your request. This header provides valuable information regarding whether the target content was cached, retrieved from the cache, or deemed uncacheable. To obtain this information in a human-readable format, refer to the X-Cache-Info response header.
It’s important to note that this functionality is not activated by default. To enable the inclusion of the X-Cache-Info response header, you need to specify the following entry within your farm configuration:
/info "1"
For example:
/farm
{
    /techrevelpublishfarm
    {
        # Include X-Cache-Info response header if X-Dispatcher-Info is in request header
        /info "1"
    }
}
Additionally, when testing with tools like curl, the X-Dispatcher-Info header should be present in the request, but it doesn’t require a specific value. Here’s an example using curl:
curl -v -H "X-Dispatcher-Info: true" https://localhost/content/wknd/us/en.html
The X-Dispatcher-Info header can provide the following response headers, each conveying different information:
- cached: Indicates that the target file is present in the cache, and the Dispatcher has confirmed its validity for delivery.
- caching: Signifies that the target file is not found in the cache, but the Dispatcher has determined it’s suitable for caching and delivery.
- caching: stat file is more recent: Indicates that the target file is in the cache but invalidated by a more recent stat file. In response, the Dispatcher deletes the target file, recreates it from the output, and delivers it.
- not cacheable: no document root: Indicates that the farm’s configuration lacks a document root, specified by the cache.docroot element.
- not cacheable: cache file path too long: Denotes that the combined length of the document root and URL file exceeds the system’s maximum file name length.
- not cacheable: temporary file path too long: Signifies that the temporary file name template exceeds the maximum file name length. The Dispatcher creates a temporary file with a unique name before creating or overwriting the cached file.
- not cacheable: request URL has no extension: Indicates that the request URL lacks an extension or contains a path following the file extension.
- not cacheable: request wasn’t a GET or HEAD: Signifies that the HTTP method used is not GET or HEAD, implying the presence of dynamic data that should not be cached.
- not cacheable: request contained a query string: Suggests that the request contained a query string, making the output dependent on the query string and unsuitable for caching.
- not cacheable: session manager didn’t authenticate: Indicates that the farm’s cache is managed by a session manager, but the request lacked proper authentication information.
- not cacheable: request contains authorization: Denotes that the farm is prohibited from caching output (allowAuthorized 0), and the request contains authentication details.
- not cacheable: target is a directory: Suggests that the target file is a directory, which may indicate an issue where a URL and a sub-URL both contain cacheable content.
- not cacheable: request URL has a trailing slash: Indicates that the request URL ends with a trailing slash.
- not cacheable: request URL not in cache rules: Suggests that the cache rules explicitly forbid caching the output of a specific request URL.
- not cacheable: authorization checker denied access: Indicates that the farm’s authorization checker denied access to the cached file.
- not cacheable: session not valid: Signifies that the farm’s cache is managed by a session manager, and the user’s session is either not valid or has expired.
- not cacheable: response contains no_cache: Indicates that the remote server returned a Dispatcher: no_cache header, prohibiting caching of the output.
- not cacheable: response content length is zero: Signifies that the response’s content length is zero, and the Dispatcher does not create zero-length files.
For more details on how to debug headers via Postman, Chrome devtools and dispatcher logs, please refer to section “Debugging response headers” on https://techrevel.blog/2023/09/05/exploring-aem-request-and-response-headers-analysis-of-browser-cdn-and-dispatcher/

4 thoughts on “Deep-dive into AEM dispatcher’s cache flush strategies”